Tutorial: Configuring the presentation of your offer and the reservation process (1 / 5)
Tutorial Table of Contents
part 1: Resource presentation in advanced integrationpart 2: Two ways of presenting your resources
part 3: The planyo plugin
part 4: Adding widgets
part 5: Customizing the look of the resource listing and details
Part 1 of 5: Resource presentation in advanced integration
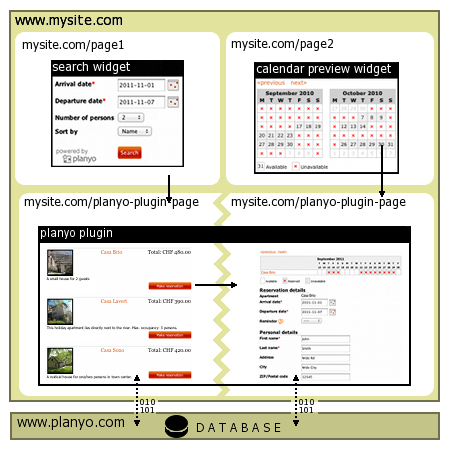
Basically the only needed thing in order to integrate planyo into your website is to include the planyo plugin into a single webpage on your website. This can be done using simple copy/paste of HTML code or using one of the supported modules/plugins/extensions for popular CMS systems such as joomla, drupal, wordpress, typo3, modx etc.
Once you have the planyo plugin on a page of your website, you have all that you need. This plugin will by default show the resource listing (unless the default mode was changed by you in plugin settings). Clicking on a resource will then go to the resource details page and then clicking on a date or the 'make reservation' button will go to the reservation page. Once the reservation is done, the customer may also come back to this page for other actions such as email verification / payment / modifications / cancellation etc. (all this depends on your other settings). It's important to understand that all these functionalities (starting with resource list and ending with the reservation form and post-reservation actions) are done on a single web page (URL) of your website. Planyo knows what context (mode) to use by looking at the URL parameters. For example choosing a resource from the listing will add a resource_id parameter to the URL.
The above process can be of course changed. The most frequent change is addition of widgets in one or more places on your website. Most frequently used widgets are the availability preview calendars (for one or all resources at the same time) and a small search box. These widgets, when clicked on or submitted, will also take the visitor to your page with the planyo plugin. This is why when you go to get the HTML code to copy/paste for the widgets, you must specify the URL of the page with the planyo plugin. This creates the necessary connection between the widget and the plugin. See part 4 for details of adding widgets.